References
Table of Contents
- Kubernetes Secure Architecture
- Containers Under the Hood
- Network Policies
- GUI Elements
- Secure Ingress
- Node Metadata Protection
- CIS Benchmarks
- Verifying Platform Binaries
- RBAC
- Restricting API Access
- Upgrading Kubernetes
- Managing Kubernetes Secrets
- Container Runtime Sandboxes
- OS Level Security Domains
- mTLS
- OPA
- Image Footprint
- Static Analysis
- Image Vulnerability Scanning
- Secure Supply Chain
- Behavioral Analytics
Kubernetes Secure Architecture
Kubernetes certificates are located in /etc/kubernetes/pki.
The kubelet, kube-controller-manager, and kube-scheduler client certificates are held in kubeconfigs at /etc/kubernetes/*.conf.
The kubelet server certificates are held in /var/lib/kubelet.
Containers Under the Hood
Applications within containers and their associated binaries operate by making syscalls to the shared kernel’s syscall interface. In this way, all containers running on a node have a level of access to the host’s kernel.
Vulnerabilities in the Linux kernel could degrade the level of isolation between applications running within containers.
CGroups restrict a processes resource use when interacting with the host’s kernel:
- RAM
- Disk
- CPU
Namespaces restrict what processes can see:
- PID - isolates processes, and allows the same PID number to be used on the same host in different namespaces
- Mount - Restrict access to mounts and the root filesystem
- Network - Only allows access to certain devices, firewalls, restricts visibility of traffic from outside the namespace
- User - Isolates user ids and restricts use of the host’s root user within a container/namespace
Network Policies
NetworkPolicy resources behave as Firewall rules in Kubernetes. These are implemented by the CNI and exist at the Namespace level.
They can be used to Ingress/Egress traffic for a pod, group of pods, or all pods in a namespace based on rules and conditions.
Example Network Policy:
apiVersion: networking.k8s.io/v1
kind: NetworkPolicy
metadata:
  name: my-network-policy
  namespace: my-namespace
spec:
  podSelector:
    matchLabels:
      app: backend
  policyTypes:
    - Ingress
    - Egress
  ingress:
    - from:
        - podSelector:
            matchLabels:
              app: frontend
      ports:
        - port: 80
          protocol: TCP
  egress:
    - to:
        - podSelector:
            matchLabels:
              app: db
        - ipBlock:
	        cidr: 10.0.0.0/24
      ports:
        - port: 3306
podSelectoris used to apply aNetworkPolicyto a pod or group of pods.podSelectorandnamespaceSelectorare used to match pods for Ingress/Egress rules.- An
ipBlockcan also be used to set rules for a specific ip range using CIDR notation. - An empty rule definition (
egress: {},ingress: {}) acts as a deny-all rule for that direction of traffic flow.
Example deny-all NetworkPolicy:
apiVersion: networking.k8s.io/v1
kind: NetworkPolicy
metadata:
  name: default-deny-all
  namespace: my-namespace
spec:
  podSelector:
    matchLabels:
      app: backend
  policyTypes:
  - Ingress
  - Egress
If a pod has more than one matching NetworkPolicy, the effect of all rules in each NetworkPolicy will be joined together and applied to the pod.
GUI Elements
Kubernetes Dashboard Links:
- Deploy and Access the Kubernetes Dashboard | Kubernetes
- GitHub - Kubernetes/dashboard: General-purpose web UI for Kubernetes clusters
- Kubernetes Dashboard Arguments
The Kubernetes Dashboard does not allow concurrent HTTP and HTTPS access.
RBAC for the kubernetes-dashboard service account can be adjusted with ClusterRole/Role and ClusterRoleBinding/RoleBinding resources to manage what is visible in the Kubernetes Dashboard.
Interesting Kubernetes Dashboard Arguments:
--authentication-mode: Specify basic auth, RBAC, and Token-based auth--enable-skip-login: Skips login when accessing the Dashboard--auto-generate-certificates: Dashboard automatically generates TLS certificates for HTTPS access--tls-cert-file/--tls-key-file: Specify custom TLS cert/key for HTTPS access--insecure-port: Specify a port to be used for unencrypted HTTP access
Secure Ingress
An Ingress acts as a configuration wrapper that provides instructions to an ingress controller on how to proxy traffic to a Service.
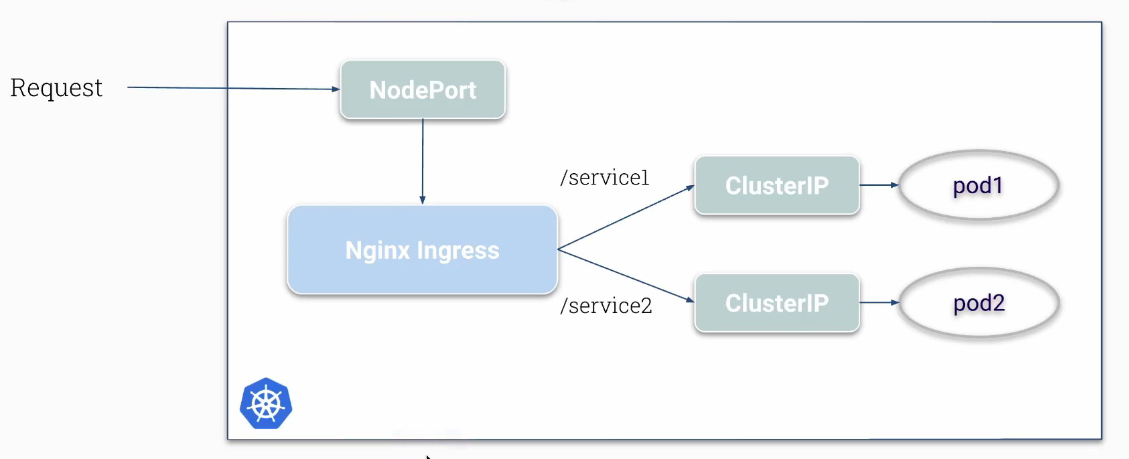
A ClusterIP service always routes traffic to Pods.
A NodePort service works similarly to a ClusterIP service, with the additional behavior of opening a listening port on all Nodes in the cluster.
A LoadBalancer service behaves almost identically to a NodePort service (creates a Cluster IP address and opens a listening port on all nodes), with the additional behavior of creating a LoadBalancer in the cluster’s Cloud Environment that routes traffic to the listening port on cluster’s nodes.
The ingress controller’s NodePort or LoadBalancer service will receive traffic, and the ingress controller will proxy traffic to the ClusterIP service of the targeted Pod.
Example Ingress Configuration:
apiVersion: networking.k8s.io/v1
kind: Ingress
metadata:
  name: minimal-ingress
  annotations:
    nginx.ingress.kubernetes.io/rewrite-target: /
spec:
  ingressClassName: nginx-example
  rules:
  - http:
      paths:
      - path: /testpath
        pathType: Prefix
        backend:
          service:
            name: test
            port:
              number: 80
Example Ingress Configuration with Wildcard Host:
apiVersion: networking.k8s.io/v1
kind: Ingress
metadata:
  name: ingress-wildcard-host
spec:
  rules:
  - host: "foo.bar.com"
    http:
      paths:
      - pathType: Prefix
        path: "/bar"
        backend:
          service:
            name: service1
            port:
              number: 80
  - host: "*.foo.com"
    http:
      paths:
      - pathType: Prefix
        path: "/foo"
        backend:
          service:
            name: service2
            port:
              number: 80
An ingress controller uses a Generic Default Certificate to secure HTTPS traffic. It’s best practice to secure HTTPS traffic using a custom TLS certificate.
Generate a Self-Signed Certificate
$ openssl req -x509 -newkey rsa:4096 -keyout key.pem -out cert.pem -days 365 -nodes
Create a TLS Secret
Create a file named testsecret-tls.yaml with the following contents:
apiVersion: v1
kind: Secret
metadata:
  name: testsecret-tls
  namespace: default
data:
  tls.crt: base64 encoded cert
  tls.key: base64 encoded key
type: kubernetes.io/tls
Then apply the configuration using kubectl apply -f ./testsecret-tls.yaml. This can also be done imperatively through kubectl using the command:
$ kubectl create secret tls testsecret-tls --cert=./cert.pem --key=./key.pem --namespace default
Create an Ingress using the TLS Secret
apiVersion: networking.k8s.io/v1
kind: Ingress
metadata:
  name: tls-example-ingress
spec:
  tls:
  - hosts:
      - https-example.foo.com
    secretName: testsecret-tls
  rules:
  - host: https-example.foo.com
    http:
      paths:
      - path: /
        pathType: Prefix
        backend:
          service:
            name: service1
            port:
              number: 80
Locally testing the Ingress configuration
$ curl https://https-example.foo.com -kv --resolve=https-example.foo.com:x.x.x.x
- Replace
x.x.x.xwith the IP Address of a worker node in the cluster - The Ingress
NodePortservice’s port number may need to be appended to the end ofhttps-example.foo.comif the ingress was not deployed in thekube-systemnamespace.
$ curl https://https-example.foo.com:31407 -kv --resolve=https-example.foo.com:31407:x.x.x.x
Node Metadata Protection
A managed Metadata API is expected to be present in Cloud Environments. This Metadata API will be accessible to the Virtual Machines running in the Cloud environment and can expose sensitive data. Commonly, any process that can communicate with the Metadata API server can access all values inside the Metadata server by default.
Cloud Infrastructure Remediation Tips
- Ensure that the cloud-instance-account is assigned “least-privileges”
- Each cloud provider has a set of recommendations to follow
- Not in the hands of Kubernetes.
On the Kubernetes side of things, A NetworkPolicy can restrict pods’ access to a Metadata API Server.
Restricting access to GCP’s Metadata API Server using NetworkPolicy
cloud-metadata-deny.yaml
# all pods in namespace cannot access metadata endpoint
apiVersion: networking.k8s.io/v1
kind: NetworkPolicy
metadata:
  name: cloud-metadata-deny
  namespace: default
spec:
  podSelector: {}
  policyTypes:
  - Egress
  egress:
  - to:
    - ipBlock:
        CIDR: 0.0.0.0/0
        except:
        - 169.254.169.254/32
cloud-metadata-allow.yaml
# only pods with label are allowed to access metadata endpoint
apiVersion: networking.k8s.io/v1
kind: NetworkPolicy
metadata:
  name: cloud-metadata-allow
  namespace: default
spec:
  podSelector:
    matchLabels:
      role: metadata-accessor
  policyTypes:
  - Egress
  egress:
  - to:
    - ipBlock:
        cidr: 169.254.169.254/32
Using the manifests above, any pods with the label role: metadata-accessor will be allowed to access the Metadata API Server.
CIS Benchmarks
CIS Benchmarks provide default Kubernetes security rules. Instructions for applying CIS Benchmark rules are given using the default configuration file locations of kubeadm.
CIS Kubernetes Benchmark v1.6.0
kube-bench checks whether Kubernetes is deployed according to security best practices as defined in the CIS Kubernetes Benchmark
Running kube-bench inside a container
$ docker run --pid=host -v /etc:/etc:ro -v /var:/var:ro -t docker.io/aquasec/kube-bench:latest --version 1.18
Running kube-bench as a Job inside a Kubernetes cluster
$ kubectl apply -f https://raw.githubusercontent.com/aquasecurity/kube-bench/main/job.yaml

$ kubectl get pods
NAME                      READY   STATUS              RESTARTS   AGE
kube-bench-j76s9   0/1     ContainerCreating   0          3s

# Wait for a few seconds for the job to complete
$ kubectl get pods
NAME                      READY   STATUS      RESTARTS   AGE
kube-bench-j76s9   0/1     Completed   0          11s

# The results are held in the pod's logs
kubectl logs kube-bench-j76s9
[INFO] 1 Master Node Security Configuration
[INFO] 1.1 API Server
Verifying Platform Binaries
Binary validation is performed by comparing the current hash value of a file to the hash value provided by a trusted source. The hash value of a file is obtained using the shasum tool (shasum -a 512 /usr/local/bin/kube-apiserver). Binaries running within containers can also be performed using the contents of the container’s process directory in /proc
# Grab the PID of the kube-apiserver container
$ ps aux | grep kube-apiserver
root        1291  0.0  0.0  48760  3720 ?        S<   Jan03   0:01 kube-apiserver...

# Find the location of the kube-apiserver binary running within the container
$ find /proc/1291/root/ -name kube-apiserver
/proc/1291/root/usr/local/bin/kube-apiserver

# Generate the hash of the kube-apiserver binary
shasum -a 512 /proc/1291/root/usr/local/bin/kube-apiserver
bc8ad13df7a9275cf6ecec93a9e0b390898f41242999d5e32a33071ffb0205b67755f54f0a828ccd09bb9ac43a6ed9d9b1eb7e36dc8dceed5befca7cc773ede0  /proc/1291/root/usr/local/bin/kube-apiserver
RBAC
Role-based Access Control (RBAC) regulates access to computer or network resources based on the roles of individual users within an organization. Kubernetes has RBAC enabled by default and can be enabled manually using the --authorization-mode=RBAC argument for the kube-apiserver component. In Kubernetes, RBAC restricts the access of Users and ServiceAccounts to Kubernetes resources. Access is granted by specifying what is allowed. All other resources are denied by default.
Role and ClusterRole specify a set of permissions. RoleBinding and ClusterRoleBinding declare who gets a set of permissions specified within a Role/ClusterRole. Role and RoleBinding work at the Namespace level, while ClusterRole and ClusterRoleBinding work globally.
Create a Role and RoleBinding
- Create a
Rolenamed “pod-reader” in the defaultNamespace
Declarative:
apiVersion: rbac.authorization.k8s.io/v1
kind: Role
metadata:
  namespace: default
  name: pod-reader
rules:
- apiGroups: [""] # "" indicates the core API group
  resources: ["pods"]
  verbs: ["get", "watch", "list"]
Imperative:
$ kubectl create role -n default pod-reader --verb=get --verb=watch --verb=list --resource=pods`
- Grant the
User“jane” the permissions specified in the “pod-reader”Roleusing aRoleBindingnamed “read-pods”
Declarative:
apiVersion: rbac.authorization.k8s.io/v1
# This role binding allows "jane" to read pods in the "default" namespace.
# You need to already have a Role named "pod-reader" in that namespace.
kind: RoleBinding
metadata:
  name: read-pods
  namespace: default
subjects:
# You can specify more than one "subject"
- kind: User
  name: jane # "name" is case sensitive
  apiGroup: rbac.authorization.k8s.io
roleRef:
  # "roleRef" specifies the binding to a Role / ClusterRole
  kind: Role #this must be Role or ClusterRole
  name: pod-reader # this must match the name of the Role or ClusterRole you wish to bind to
  apiGroup: rbac.authorization.k8s.io
Imperative:
$ kubectl create rolebinding -n default read-pods --role=pod=reader --user=jane
Create a ClusterRole and ClusterRoleBinding
- Create a
ClusterRolenamed “secret-reader”
Declarative:
apiVersion: rbac.authorization.k8s.io/v1
kind: ClusterRole
metadata:
  # "namespace" omitted since ClusterRoles are not namespaced
  name: secret-reader
rules:
- apiGroups: [""]
  #
  # at the HTTP level, the name of the resource for accessing Secret
  # objects is "secrets"
  resources: ["secrets"]
  verbs: ["get", "watch", "list"]
Imperative:
$ kubectl create clusterrole secret-reader --verb=get --verb=watch --verb=list --resource=secrets
- Grant the “manager”
Groupthe permissions specified in the “secret-reader”ClusterRole
Declarative:
apiVersion: rbac.authorization.k8s.io/v1
# This cluster role binding allows anyone in the "manager" group to read secrets in any namespace.
kind: ClusterRoleBinding
metadata:
  name: read-secrets-global
subjects:
- kind: Group
  name: manager # Name is case sensitive
  apiGroup: rbac.authorization.k8s.io
roleRef:
  kind: ClusterRole
  name: secret-reader
  apiGroup: rbac.authorization.k8s.io
Imperative:
$ kubectl create clusterrolebinding read-secrets-global --clusterrole=secret-reader --group=manager
A RoleBinding can also reference a ClusterRole to grant the permissions defined in that ClusterRole to resources inside the RoleBinding’s namespace. This kind of reference lets you define common roles across your cluster, then reuse them within multiple namespaces. Permissions are additive for multiple Role/RoleBinding combinations, so binding a stricter Role to a User or ServiceAccount will not remove the permissions granted in a previously bound Role or ClusterRole. However, a Role cannot be bound to an account using a ClusterRoleBinding. RBAC permissions can be tested using the kubectl auth can-i <verb> <resource> --as <User/Group/ServiceAccount> command.
# See if the user "joe" can get pods
$ kubectl auth can-i get pod --as joe

# See if the ServiceAccount "deployment-check-sa" in the "default" Namespace
# can list Deployments
$ kubectl auth can-i list deployment --as system:serviceaccount:default:deployment-check-sa
You can aggregate several ClusterRoles into one combined ClusterRole. A controller, running as part of the cluster control plane, watches for ClusterRole objects with an aggregationRule set. The aggregationRule defines a label
selector
that the controller uses to match other ClusterRole objects that should be combined into the rules field of this one -
Using RBAC Authorization | Kubernetes
.
Here is an example aggregated ClusterRole:
apiVersion: rbac.authorization.k8s.io/v1
kind: ClusterRole
metadata:
  name: monitoring
aggregationRule:
  clusterRoleSelectors:
  - matchLabels:
      rbac.example.com/aggregate-to-monitoring: "true"
rules: [] # The control plane automatically fills in the rules
If you create a new ClusterRole that matches the label selector of an existing aggregated ClusterRole, that change triggers adding the new rules into the aggregated ClusterRole. Here is an example that adds rules to the “monitoring” ClusterRole, by creating another ClusterRole labeled rbac.example.com/aggregate-to-monitoring: true.
apiVersion: rbac.authorization.k8s.io/v1
kind: ClusterRole
metadata:
  name: monitoring-endpoints
  labels:
    rbac.example.com/aggregate-to-monitoring: "true"
# When you create the "monitoring-endpoints" ClusterRole,
# the rules below will be added to the "monitoring" ClusterRole.
rules:
- apiGroups: [""]
  resources: ["services", "endpointslices", "pods"]
  verbs: ["get", "list", "watch"]
Additionally, by creating a ClusterRoleBinding that references the “monitoring” ClusterRole, the “monitoring-sa” ServiceAccount will inherit the aggregated permissions of any ClusterRole labeled rbac.example.com/aggregate-to-monitoring: true.
apiVersion: rbac.authorization.k8s.io/v1
kind: ClusterRoleBinding
metadata:
  name: monitoring-global
subjects:
- kind: ServiceAccount
  name: monitoring-sa
  apiGroup: rbac.authorization.k8s.io
roleRef:
  kind: ClusterRole
  name: monitoring
  apiGroup: rbac.authorization.k8s.io
In Kubernetes a ServiceAccount is used by machines or pods to access the Kubernetes API. There is no “User” resource. It is assumed that a cluster-independent service manages normal users in the following ways:
- an administrator distributing private keys
- a user store like Keystone or Google Accounts
- a file with a list of usernames and passwords
In this regard, Kubernetes does not have objects which represent normal user accounts. Normal users cannot be added to a cluster through an API call. Even though a normal user cannot be added via an API call, any user that presents a valid certificate signed by the cluster’s certificate authority (CA) is considered authenticated. In this configuration, Kubernetes determines the username from the common name field in the ‘subject’ of the cert (e.g., “/CN=bob”). From there, the role based access control (RBAC) sub-system would determine whether the user is authorized to perform a specific operation on a resource - Authenticating | Kubernetes .
User Certificate Generation Process
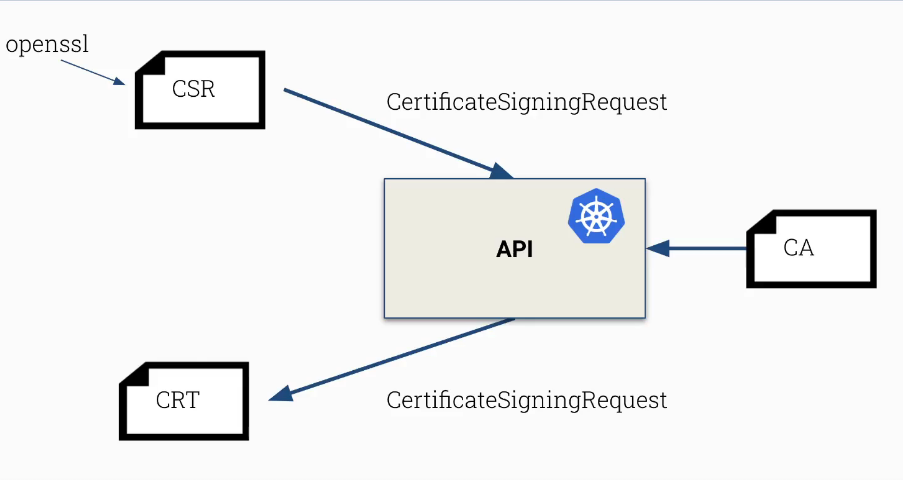
- Use
opensslto create a key and Certificate Signing Request.
$ openssl genrsa -out bob.key 2048

# The "Common Name" should match the name of the desired user in cluster (bob)
$ openssl req -new -key bob.key -out bob.csr
- Get the contents of
bob.csras a base64-encoded string
$ cat bob.csr | base64 -w 0
- Include the generated Certificate Signing Request in a new
CertificateSigningRequestresource.
# Save this as a file named bob-csr.yaml
kind: CertificateSigningRequest
metadata:
  name: bob
spec:
  groups:
  - system:authenticated
  request: <base64-encoded contents of bob.csr>
  signerName: kubernetes.io/kube-apiserver-client
  usages:
  - client auth
- The
kube-apiserverwill update theCertificateSigningRequestwith a certificate signed with the cluster’s CA.
$ kubectl create -f bob-csr.yaml
- Download the certificate and use in a kubeconfig for authentication.
# The condition of the CertificateSigningRequest shoud be "Approved"
$ kubectl get csr bob
# Look under the "status.certificate" field to retrieve the signed certificate
$ kubectl get csr bob -oyaml
# The retrieved certificate must be Base64 decoded before it can be used
$ echo <base64-encoded certificate> | base64 -d > bob.crt
# Add the Certificate and Key to your kubeconfig
$ kubectl config set-credential bob --client-key=bob.key --client-certificate=bob.crt --embed-certs
# Retrieve the name of the cluster from the kubeconfig
$ kubectl config view
# Set the context for the new user to the existing cluster
$ kubectl config set-context bob --user=bob --cluster=<cluster-name>
There is no way to invalidate a certificate. Follow the remediation steps if a certificate is leaked:
- Remove all access from the User/Certificate using RBAC. In this case, the username cannot be used until the certificate expires.
- Create a new CA and re-issue all certificates
ServiceAccount is a namespaced resource that is managed by the Kubernetes API. There is a “default” ServiceAccount in every namespace that is used by pods to communicate with the Kubernetes API. Each ServiceAccount has a token Secret that it uses for API authentication.
New temporary tokens can be generated using kubectl create token <ServiceAccount name>. The generated token aligns with the JWT standard and can be decoded with any JWT decoder -
JSON Web Token Decoder
. All pods that use a ServiceAccount will also have access to any of it’s tokens. Because ServiceAccount tokens can also be stored in Secret API objects, any user with write access to Secrets can request a token, and any user with read access to those Secrets can authenticate as the service account. Be cautious when granting permissions to service accounts and read or write capabilities for Secrets.
Specifying a ServiceAccount in a Deployment Manifest
apiVersion: apps/v1 # this apiVersion is relevant as of Kubernetes 1.9
kind: Deployment
metadata:
  name: nginx-deployment
  namespace: default
spec:
  replicas: 3
  template:
    metadata:
    # ...
    spec:
      serviceAccountName: bob-the-bot
      containers:
      - name: nginx
        image: nginx:1.14.2
The ServiceAccount details and token can be found at the /run/secrets/kubernetes.io/serviceaccount path from within a running container. The command cat /proc/mounts | grep -i serviceaccount will also display the path of the mounted ServiceAccount details when executed from within a running container.
Calling Kubernetes API from within a container using curl and the ServiceAccount token
$ curl -k https://kubernetes.default.svc -H "Authorization: Bearer $(cat /run/secrets/kubernetes.io/serviceaccount/token)"
In cases when a Pod does not need to communicate with the Kubernetes API, automounting of the ServiceAccount token can be disabled. “If both the ServiceAccount and the Pod’s .spec specify a value for automountServiceAccountToken, the Pod spec takes precedence” -
Configure Service Accounts for Pods | Kubernetes
.
Disabling token automount in a ServiceAccount manifest
apiVersion: v1
kind: ServiceAccount
metadata:
  name: build-robot
automountServiceAccountToken: false
...
Disabling token automount in a Pod manifest
apiVersion: v1
kind: Pod
metadata:
  name: my-pod
spec:
  serviceAccountName: build-robot
  automountServiceAccountToken: false
  ...
Restricting API Access
Pod Request Workflow
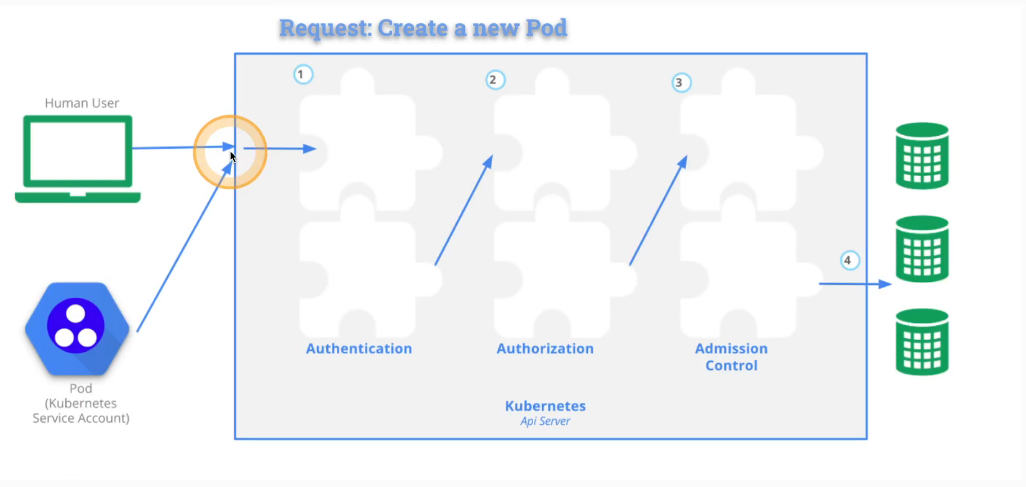
- Authentication - Validate the identity of the account making the request
- Authorization - Verify if the authenitcated account has permissions to create pods
- Admission Control - Ensure creating a new pod will not breach the cluster’s pod limit
API requests must authenticate as a normal user or a ServiceAccount. Otherwise, the request will be treated as it was sent as an anonymous user.
Securing the kube-apiserver
- Deny anonymous user requests
- Block access using an insecure port (HTTP)
- Restrict external access to the API Server
- Restrict access from Nodes to the API Server (NodeRestriction Admission Controller)
- Prevent unauthorized access ( RBAC )
- Prevent Pods from accessing the API Server (
automountServiceAccountToken: falseandNetworkPolicy) - Restrict network access to the API Server using a firewall and allowing specific ip ranges
Deny anonymous user requests
Anonymous authenciation can be disabled using the --anonymous-auth=false argument for the kube-apiserver -
kube-apiserver command-line arguments
. Anonymous access is enabled by default if the authorization-mode argument is set to any other value than AlwaysAllow. However, explicit authorization is required for anonymous authentication if the authorization-mode argument is set to ABAC or RBAC. On a kubeadm-provisioned cluster, the command-line arguments for the kube-apiserver can be modified in the /etc/kubernetes/manifests/kube-apiserver.yaml file. It’s worth noting that the kube-apiserver uses anonymous authentication for it’s own liveness probe, so disabling anonymous auth could cause the kube-apiserver to go into CrashLoopBackoff due to failed liveness checks.
Block access using an insecure port (HTTP)
Since Kubernetes v1.20, enabling insecure HTTP access is no longer possible. This was previously enabled using the --insecure-port=<port number> argument. Setting this argument to --insecure-port=0 manually disables insecure HTTP access. Authentication and authorization to the kube-apiserver is effectively bypassed when requests are sent to an insecure HTTP port, so enabling this argument is extremely dangerous and not recommended.
Manual API Server Request using curl
Manual requests to the kube-apiserver can be performed by retrieving the following data from a kubeconfig:
- The cluster’s base64-decoded
certificate-authority-datawritten to a file (e.g. ca) - The user’s base64-decoded
client-certificate-datawritten to a file (e.g. crt) - The user’s base64-decoded
client-key-datawritten to a file (e.g. key) - The API Server’s IP Address or Hostname (e.g. https://10.40.0.10:6443)
curl https://10.40.0.10:6443 --cacert ca --cert crt --key key
Inspecting Certificates using openssl
openssl x509 -in crt
Restrict External Access to the API Server
The kube-apiserver will be accessible on any node if Kubernetes Service is set to NodePort. This could expose the kube-apiserver to undesired network access. The Kubernetes Service should be set to ClusterIP.
Restrict access from Nodes to the API Server (NodeRestriction Admission Controller)
The NodeRestriction admission controller is enabled using the --enable-admission-plugins=NodeRestriction argument on the kube-apiserver.
“This admission controller limits the Node and Pod objects a kubelet can modify. In order to be limited by this admission controller, kubelets must use credentials in the system:nodes group, with a username in the form system:node:<nodeName>. Such kubelets will only be allowed to modify their own Node API object, and only modify Pod API objects that are bound to their node. kubelets are not allowed to update or remove taints from their Node API object” -
Admission Controllers Reference | Kubernetes
. The NodeRestriction admission controller ensures secure workload isolation via labels. No one can petend to be a “secure” node and schedule secure pods.
There are also restricted labels that nodes cannot modify when the NodeRestriction admission controller is enabled. These start with node-restriction.kubernetes.io/.
Upgrading Kubernetes
Reasons to Upgrade Kubernetes Frequently
- Support
- Security Fixes
- Bug Fixes
- Stay up-to-date for dependencies
Kubernetes releases are labeled using symantic versioning:
v1.19.2
- 1 - major version
- 19 - minor version
- 2 - patch version
A minor version releases every 3 months and there is no Long Time Support (LTS) in Kubernetes. Kubernetes maintains maintenance release branches for the most recent three minor versions. Applicable fixes may be backported to those three release branches depending on severity and feasibility.
Cluster Component Upgrade Info
- First upgrade the master node components
kube-apiserverkube-controller-managerkube-scheduler
- Next, upgrade the worker node components
kubeletkube-proxy
Master node components must either the same major and minor version as the kube-apiserver, or be one minor version behind. This behavior allows for in-place upgrades. kubectl can be one minor version ahead or behind the kube-apiserver. The kubelet and kube-proxy must share the same version, but can be two minor versions behind the kube-apiserver.
Cluster Upgrade Workflow
kubectl drain- Safely eficts all pods from the node
- Marks the node as
SchedulingDisable(kubectl cordon)
- Perform the upgrade
apt-mark hold kubelet kubectlapt-mark unhold kubeadmapt-get updateapt-get install kubeadm=1.x.x-00kubeadm upgrade plankubeadm upgrade apply v1.x.x(master) /kubeadm upgrade node(worker)apt-mark unhold kubelet kubectlapt-get install kubelet=1.x.x-00 kubectl=1.x.x-00apt-mark hold kubelet kubectl kubeadm
kubectl uncordon
Upgrading kubeadm clusters | Kubernetes
Managing Kubernetes Secrets
“A Secret is an object that contains a small amount of sensitive data such as a password, a token, or a key. Such information might otherwise be put in a Pod specification or in a container image . Using a Secret means that you don’t need to include confidential data in your application code.
Because Secrets can be created independently of the Pods that use them, there is less risk of the Secret (and its data) being exposed during the workflow of creating, viewing, and editing Pods. Kubernetes, and applications that run in your cluster, can also take additional precautions with Secrets, such as avoiding writing secret data to nonvolatile storage.” - https://kubernetes.io/docs/concepts/configuration/secret/
Creating and Using Secrets
- Create the
Secretnamed “mysecret” Imperative:
apiVersion: v1
kind: Secret
metadata:
  name: mysecret
  namespace: default
type: Opaque
data:
  username: YWRtaW4=
  password: YmlyZHNhcmVudHJlYWw=
Declarative:
$ kubectl create secret generic -n default mysecret --from-literal=username=admin --from-literal=1f2d1e2e67df
- Create a pod that mounts the
Secret
apiVersion: v1
kind: Pod
metadata:
  name: mypod
spec:
  containers:
  - name: mypod
    image: redis
    volumeMounts:
    - name: foo
      mountPath: "/etc/foo"
      readOnly: true
  volumes:
  - name: foo
    secret:
      secretName: mysecret
      optional: true
If a user has access on a node, the user is able to see the environment variable Secret of a pod using crictl inspect/docker inspect and can access mounted secrets from the /proc/<pid>/root directory on the host.
Accessing a Secret in etcd
# Accessing secret in etcd
cat /etc/kubernetes/manifests/kube-apiserver.yaml | grep etcd

ETCDCTL_API=3 etcdctl --cert /etc/kubernetes/pki/apiserver-etcd-client.crt --key /etc/kubernetes/pki/apiserver-etcd-client.key --cacert /etc/kubernetes/pki/etcd/ca.crt endpoint health

# --endpoints "https://127.0.0.1:2379" not necessary because we’re on same node

ETCDCTL_API=3 etcdctl --cert /etc/kubernetes/pki/apiserver-etcd-client.crt --key /etc/kubernetes/pki/apiserver-etcd-client.key --cacert /etc/kubernetes/pki/etcd/ca.crt get /registry/secrets/default/mysecret
Encrypting etcd
Since the kube-apiserver is the only component that communicates with etcd, it will be responsible for encrypting secrets. This can be achieved using an EncryptionConfiguration.
“The kube-apiserver process accepts the --encryption-provider-config=/path/to/encryptionconfig.yaml argument that controls how API data is encrypted in etcd. The configuration is provided as an API named
EncryptionConfiguration
. --encryption-provider-config-automatic-reload boolean argument determines if the file set by --encryption-provider-config should be automatically reloaded if the disk contents change. This enables key rotation without API server restarts. An example configuration is provided below.” -
Encrypting Secret Data at Rest | Kubernetes
apiVersion: apiserver.config.k8s.io/v1
kind: EncryptionConfiguration
resources:
  - resources:
      - secrets
    providers:
      - identity: {}
      - aesgcm:
          keys:
            - name: key1
              secret: c2VjcmV0IGlzIHNlY3VyZQ==
            - name: key2
              secret: dGhpcyBpcyBwYXNzd29yZA==
      - aescbc:
          keys:
            - name: key1
              secret: c2VjcmV0IGlzIHNlY3VyZQ==
            - name: key2
              secret: dGhpcyBpcyBwYXNzd29yZA==
      - secretbox:
          keys:
            - name: key1
              secret: YWJjZGVmZ2hpamtsbW5vcHFyc3R1dnd4eXoxMjM0NTY=
The EncryptionConfiguration providers are used in order. The first provider is used when saving a new Secret. In the example above, no encryption is used by default, but aesgcm, aescbc and secretbox are used as fallbacks. A Secret encrypted with any one of these algorithms can be decrypted.
apiVersion: apiserver.config.k8s.io/v1
kind: EncryptionConfiguration
resources:
  - resources:
      - secrets
      - configmaps
      - pandas.awesome.bears.example
    providers:
      - aesgcm:
          keys:
            - name: key1
              secret: c2VjcmV0IGlzIHNlY3VyZQ==
      - identity: {}
In the example above, all of the specified resources in the resources.resources map are saved using aesgcm by default. However, unencrypted instances of these resources can still be read (identity: {}). In a production environment, it’s best to use an external keystore as a provider to hold encryption keys as an attacker who gains access to a master node may be able to read encryption keys from the EncryptionConfiguration manifest located on the host’s filesystem.
“For high-availability configurations (with two or more control plane nodes), the encryption configuration file must be the same! Otherwise, the kube-apiserver component cannot decrypt data stored in the etcd.” -
Encrypting Secret Data at Rest | Kubernetes
The /etc/kubernetes/manifests/kube-apiserver.yaml must be edited to include the --encryption-provider-config=/path/to/encryptionconfig.yaml argument and a volume mount and mountPath must be added to make the EncryptionConfiguration available from within the kube-apiserver pod. In case the kube-apiserver.yaml file is misconfigured and the kube-apiserver pod does not come back up, the logs for the kube-apiserver can be found in /var/log/pods.
apiVersion: v1
kind: Pod
metadata:
  annotations:
    kubeadm.kubernetes.io/kube-apiserver.advertise-address.endpoint: 10.10.30.4:6443
  creationTimestamp: null
  labels:
    component: kube-apiserver
    tier: control-plane
  name: kube-apiserver
  namespace: kube-system
spec:
  containers:
  - command:
    - kube-apiserver
    ...
    - --encryption-provider-config=/etc/kubernetes/enc/enc.yaml  # <-- add this line
    volumeMounts:
    ...
    - name: enc                           # <-- add this line
      mountPath: /etc/kubernetes/enc      # <-- add this line
      readonly: true                      # <-- add this line
    ...
  volumes:
  ...
  - name: enc                             # <-- add this line
    hostPath:                             # <-- add this line
      path: /etc/kubernetes/enc           # <-- add this line
      type: DirectoryOrCreate             # <-- add this line
  ...
Resources that were created before encryption configuration must be recreated to receive encryption.
$ kubectl get secret -A -oyaml | kubectl replace -f -
Container Runtime Sandboxes
“Containers are not contained”. Containers still communicate with the host’s kernel during runtime. If a container breakout takes place in one container, an attacker could gain access to all other containers running on the host. A Container Runtime Sandbox acts as an additional security layer to reduce the attack surface exposed to a container. This Sandbox blocks a container from making syscalls directly to the host’s kernel.
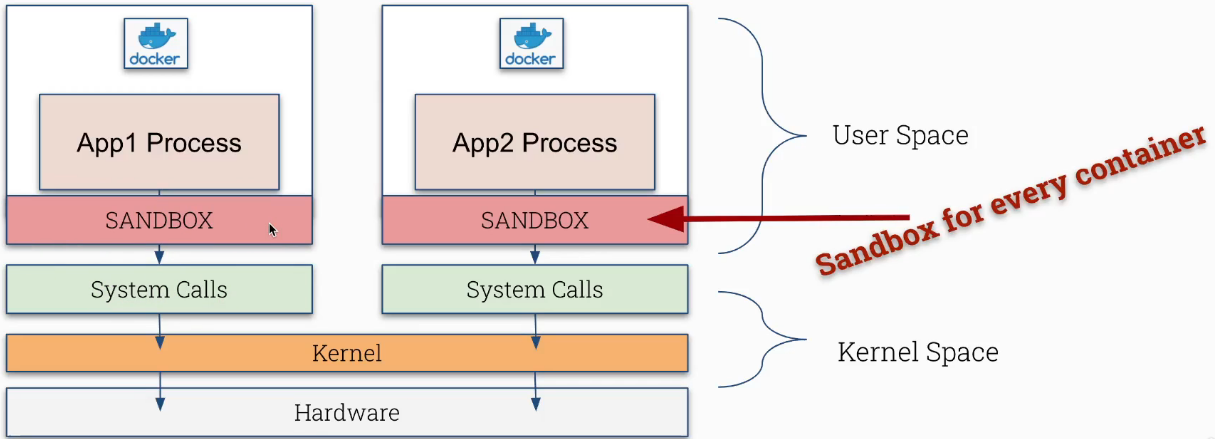
Container Runtime Sandbox Considerations
- May require more resources
- Is a better solution for smaller containers
- Not recommended for syscall intensive workloads
- No direct access to hardware
The strace command can be used to inspect which syscalls are made for a particular process.
# Inspect which syscalls are made to the linux kernel for the "uname" command
strace uname -r
The Open Container Initiative (OSI) is a Linux Foundation project that designs open standards for container virtualization. These specifications allow developers to engineer container-based applications while maintaining compatibility with other projects in the container software ecosystem.
Container Runtimes in Kubernetes
- Add the
--container-runtime={string}or--container-runtime-endpoint {string}argument to thekubeletconfiguration. - Create a
RuntimeClassresource in the cluster - Runtime Class | Kubernetes

Currently, the kubelet can only use one container runtime at any given time. Using a Container Runtime allows the use of other runtimes increases the flexibility of the cluster (docker, containerd).
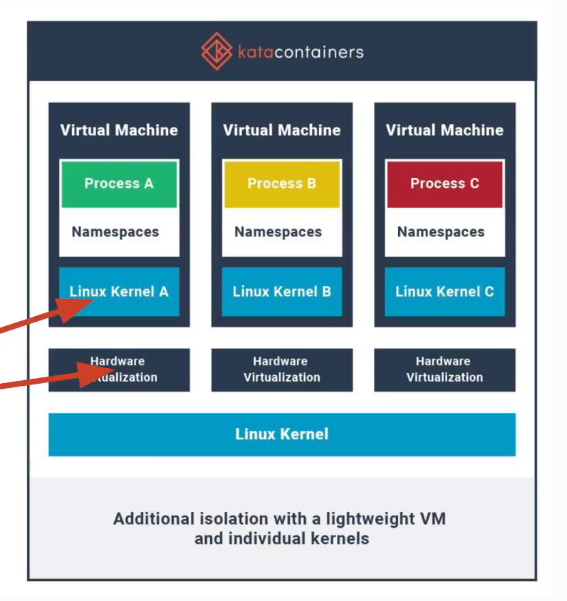
Kata Containers
Kata Containers is a runtime sandbox that provides additional isolation to containers using a lightweight VM and individual kernels. “A second layer of isolation is created on top of those provided by traditional namespace-containers. The hardware virtualization interface is the basis of this additional layer. Kata will launch a lightweight virtual machine, and use the guest’s Linux kernel to create a container workload, or workloads in the case of multi-container pods. In Kubernetes and in the Kata implementation, the sandbox is carried out at the pod level. In Kata, this sandbox is created using a virtual machine.” - kata-containers/virtualization.md at main · kata-containers/kata-containers · GitHub
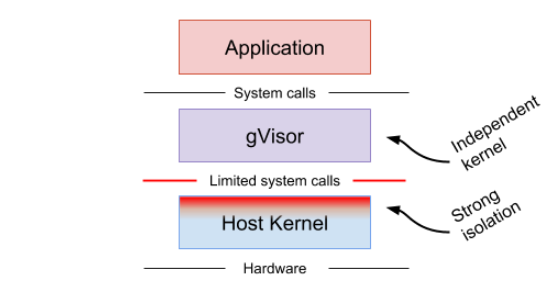
gVisor
“gVisor is an application kernel, written in Go, that implements a substantial portion of the Linux system call interface . It provides an additional layer of isolation between running applications and the host operating system.” - What is gVisor? - gVisor
gVisor (runsc) acts as a user-space kernel for containers that simulates kernel syscalls with limited functionality.
Configuring a RuntimeClass
# RuntimeClass is defined in the node.k8s.io API group
apiVersion: node.k8s.io/v1
kind: RuntimeClass
metadata:
  # The name the RuntimeClass will be referenced by.
  # RuntimeClass is a non-namespaced resource.
  name: gvisor
# The name of the corresponding CRI configuration
handler: runsc
Once RuntimeClasses are configured for the cluster, you can specify a runtimeClassName in the Pod spec to use it. For example:
apiVersion: v1
kind: Pod
metadata:
  name: mypod
spec:
  runtimeClassName: gvisor
  # ...
OS Level Security Domains
“A security context defines privilege and access control settings for a Pod or Container. Security context settings include, but are not limited to:
- Discretionary Access Control: Permission to access an object, like a file, is based on user ID (UID) and group ID (GID) .
- Security Enhanced Linux (SELinux) : Objects are assigned security labels.
- Running as privileged or unprivileged.
- Linux Capabilities : Give a process some privileges, but not all the privileges of the root user.
- AppArmor : Use program profiles to restrict the capabilities of individual programs.
- Seccomp : Filter a process’s system calls.
allowPrivilegeEscalation: Controls whether a process can gain more privileges than its parent process. This bool directly controls whether theno_new_privsflag gets set on the container process.allowPrivilegeEscalationis always true when the container:- is run as privileged, or
- has
CAP_SYS_ADMIN
readOnlyRootFilesystem: Mounts the container’s root filesystem as read-only.
The above bullets are not a complete set of security context settings – please see SecurityContext for a comprehensive list.” - https://kubernetes.io/docs/tasks/configure-pod-container/security-context/
A security context can be defined at the pod level and the container level. The container level security context overrides the pod level security context.
Setting Container UID and GID
...
spec:
# Pod Level
 securityContext:
   runAsUser: 1000
   runAsGroup: 3000
 containers:
 - image: nginx
   name: webserver
   # Container Level
   securityContext:
     runAsUser: 300
...
Forcing a Container to Run as Non-Root
...
spec:
 containers:
 - image: nginx
   name: webserver
   securityContext:
     runAsNonRoot: true
     # Include 'runAsUser' if the container image runs as root by default
     runAsUser: 1000

...
Privileged Containers
Privileged means the container’s root user is directly mapped to UID 0 (root) on the host.

By default, Docker containers run as “unprivileged” and running privileged containers requires the following docker run command:
$ docker run --privileged
This can be achieved in Kubernetes as well:
...
spec:
  containers:
  - image: nginx
    name: webserver
    securityContext:
      privileged: true
...
AllowPrivilegeEscalation
AllowPrivilegeEscalation controls whether a process can gain more privileges than it’s parent process. By default, Kubernetes allows privilege escalation.
...
spec:
  containers:
  - image: nginx
    name: webserver
    securityContext:
      AllowPrivilegeEscalation: false
...
mTLS
Mutual TLS (mTLS) is a bilateral authentication method that allows two parties to authenticate each other simultaneously. By default, Kubernetes allows all pods to communicate over unencrypted channels. mTLS allows pods to communicate using encrypted network traffic. To achieve this, each app container would need the ability to encrypt and decrypt traffic.
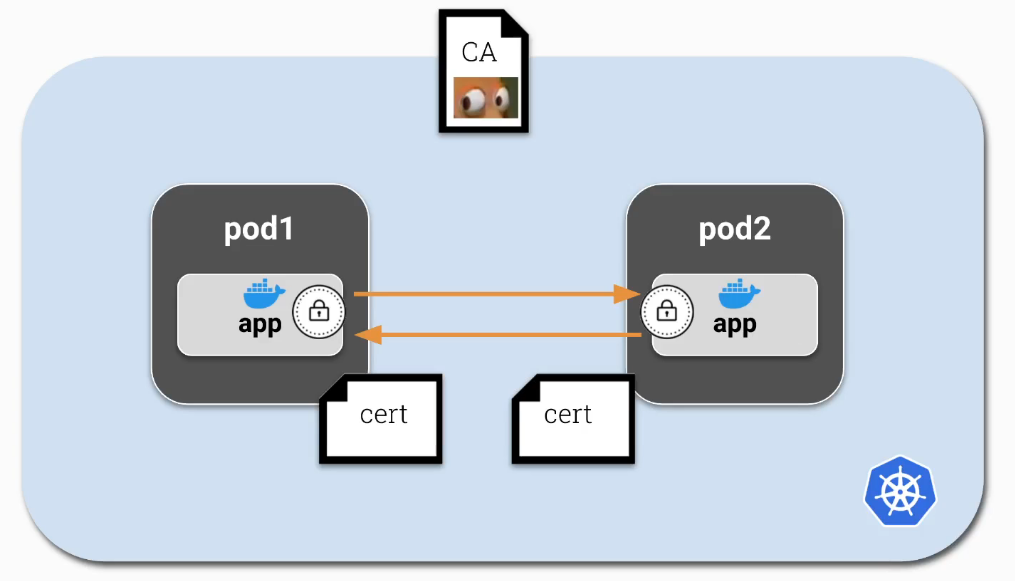
A ServiceMesh can be used to make the setup and management of mTLS easier. This allows the application containers to continue to use HTTP communication while the ServiceMesh or Proxy sidecar containers manage TLS logic.
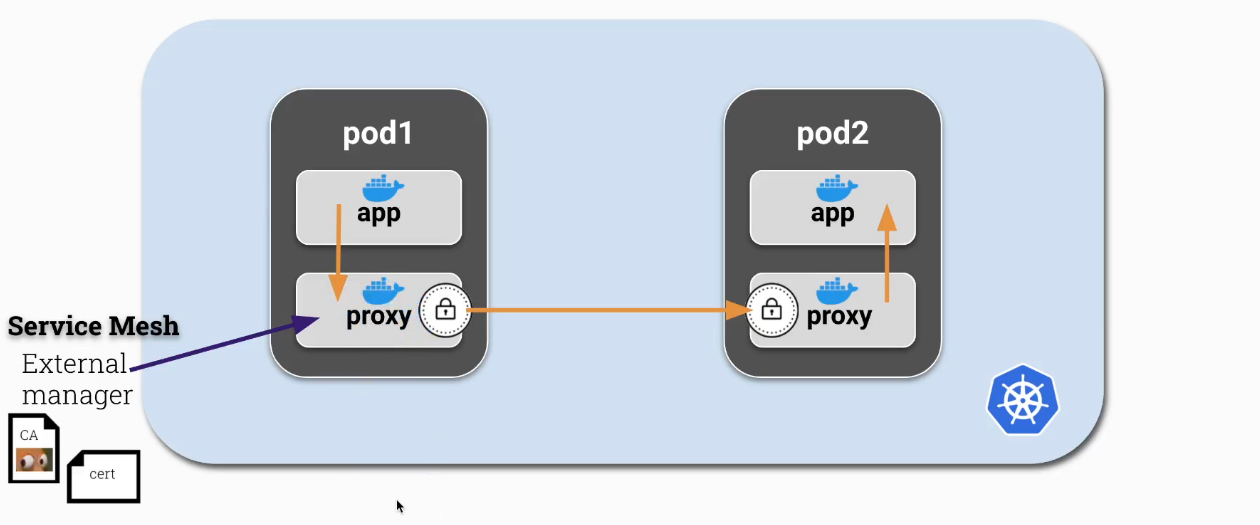
ServiceMesh Providers:
A ServiceMesh/Proxy container acts as a man-in-the-middle between application containers and the parties they communicate with. This is achieved by configuring iptables rules to route traffic through the proxy, and is typically carried out in an initContainer with NET_ADMIN capability at pod initialization.
Demystifying Istio’s Sidecar Injection Model
OPA
“The Open Policy Agent (OPA) is an open source, general-purpose policy engine that enables unified, context-aware policy enforcement across the entire stack.”
OPA is not Kubernetes-specific. OPA can be used for a multitude of web applications. It offers easy implementation of policies using the domain-specific Rego programming language, works with JSON/YAML, and uses Admission Controllers in Kubernetes.
OPA Gatekeeper provides CRDs to allow easier integration of OPA into a Kubernetes cluster.
ConstraintTemplate and Constraint
A ConstraintTemplate allows OPA to create a general-use CRD that we can implement using a Constraint.
apiVersion: templates.gatekeeper.sh/v1beta1
kind: ConstraintTemplate
metadata:
  name: k8srequiredlabels
...
apiVersion: constraints.gatekeeper.sh/v1beta1
kind: K8sRequiredLabels
metadata:
  name: pod-must-have-gk
...
Image Footprint
Containers vs. Virtual Machines

All containers are organized in kernel groups and have access to the same host kernel of the same host’s Operating System.

Container images are built in layers. As layers increase, so does the size of the container image. When creating a Dockerfile, only the instructions RUN, COPY, and ADD create layers. All other instructions create temporary images and do not increase the size of the build.
Reducing Image Footprint
Multi-Stage builds can be used to reduce a container image’s footprint.
FROM ubuntu
ARG DEBIAN_FRONTEND=noninteractive
RUN apt-get update && apt-get install -y golang-go
COPY app.go .
RUN CGO_ENABLED=0 go build app.go
CMD ["./app"]
This Dockerfile uses Ubuntu as it’s base. It’s likely that this image’s footprint is far larger than we need to run our little go app.
# build container stage 1
FROM ubuntu
ARG DEBIAN_FRONTEND=noninteractive
RUN apt-get update && apt-get install -y golang-go
COPY app.go .
RUN CGO_ENABLED=0 go build app.go

# app container stage 2
FROM alpine
COPY --from=0 /app .
CMD ["./app"]
Instead we can build our app using the Ubuntu image in stage 1, then COPY the binary to an image with a much smaller footprint in stage 2. Our resulting image will use the smaller container image from stage 2 as it’s base. This way, we can reduce the potential attack surface of any containers spawned from this image and decrease the image’s overall size.
Securing and Hardening Images
Container images should always be built using specific base image and package versions. This reduces the risk of package updates in upstream images breaking the running application.
FROM ubuntu:22.04
ARG DEBIAN_FRONTEND=noninteractive
RUN apt-get update && apt-get install -y golang-go-1.18.0
COPY app.go .
RUN CGO_ENABLED=0 go build app.go

FROM alpine:3.12.1
COPY --from=0 /app .
CMD ["./app"]
It’s also important to avoid running the application as root inside the container image.
FROM ubuntu:22.04
ARG DEBIAN_FRONTEND=noninteractive
RUN apt-get update && apt-get install -y golang-go-1.18.0
COPY app.go .
RUN CGO_ENABLED=0 go build app.go

FROM alpine:3.12.1
RUN addgroup -S appgroup && adduser -S appuser -G appgroup -h /opt/app
COPY --from=0 /app /opt/app
USER appuser
CMD ["/opt/app"]
After the USER instruction is called, all following instructions are performed as the specified user.
Making the filesystem read-only is a great way to ensure the immutability of the container image’s filesystem at runtime. This can also achieved in Kubernetes, but doing so while building the container is a good exercise of defense-in-depth.
FROM ubuntu:22.04
ARG DEBIAN_FRONTEND=noninteractive
RUN apt-get update && apt-get install -y golang-go-1.18.0
COPY app.go .
RUN CGO_ENABLED=0 go build app.go

FROM alpine:3.12.1
RUN addgroup -S appgroup && adduser -S appuser -G appgroup -h /opt/app
RUN chmod a-w /etc /lib /sbin /usr /root
COPY --from=0 /app /opt/app
USER appuser
CMD ["/opt/app"]
Lastly, attackers can be prohibited from getting command-line access to a container by removing shell access.
FROM ubuntu:22.04
ARG DEBIAN_FRONTEND=noninteractive
RUN apt-get update && apt-get install -y golang-go-1.18.0
COPY app.go .
RUN CGO_ENABLED=0 go build app.go

FROM alpine:3.12.1
RUN chmod a-w /etc /bin /lib /sbin /usr /root
RUN addgroup -S appgroup && adduser -S appuser -G appgroup -h /opt/app
RUN chmod a-w /etc /lib /sbin /usr /root
RUN rm -rf /bin/*
COPY --from=0 /app /opt/app
USER appuser
CMD ["/opt/app"]
Static Analysis
kubesec is an open-source, opinionated tool for risk anaylsis scanning of Kubernetes resources. Kubesec runs as a binary, a Docker container, a kubectl (kubectl-scan) plugin and a Kubernetes Admission Controller (kubesec-webhook).
Scaning using the kubesec Docker container
$ docker run -i kubesec/kubesec:512c5e0 scan /dev/stdin < pod.yaml
“Kubesec returns a returns a JSON array, and can scan multiple YAML documents in a single input file.” - https://kubesec.io/#example-output
“ OPA Conftest helps you write tests against structured configuration data. Using Conftest you can write tests for your Kubernetes configuration, Tekton pipeline definitions, Terraform code, Serverless configs or any other config files.
Conftest uses the Rego language from Open Policy Agent for writing the assertions. You can read more about Rego in How do I write policies in the Open Policy Agent documentation.” - GitHub - open-policy-agent/conftest: Write tests against structured configuration data using the Open Policy Agent Rego query language
Conftest scanning for Kubernetes YAML
Example. Save the following as policy/deployment.rego:
package main

deny[msg] {
  input.kind == "Deployment"
  not input.spec.template.spec.securityContext.runAsNonRoot

  msg := "Containers must not run as root"
}

deny[msg] {
  input.kind == "Deployment"
  not input.spec.selector.matchLabels.app

  msg := "Containers must provide app label for pod selectors"
}
Next, save the following Kubernetes manifest as deployment.yaml:
apiVersion: apps/v1
kind: Deployment
metadata:
  creationTimestamp: null
  labels:
    app: test
  name: test
spec:
  replicas: 1
  strategy: {}
  template:
    metadata:
      creationTimestamp: null
      labels:
        app: test
    spec:
      containers:
        - image: httpd
          name: httpd
          resources: {}
status: {}
Assuming you have a Kubernetes deployment in deployment.yaml you can run Conftest like so:
$ conftest test deployment.yaml
FAIL - deployment.yaml - Containers must not run as root
FAIL - deployment.yaml - Containers must provide app label for pod selectors

2 tests, 0 passed, 0 warnings, 2 failures, 0 exceptions
Fixing the deployment.yaml file according to conftest’s suggestions:
apiVersion: apps/v1
kind: Deployment
metadata:
  creationTimestamp: null
  labels:
    app: test
  name: test
spec:
  replicas: 1
  # "app" label for pod selector (input.spec.selector.matchLabels.app)
  selector:
    matchLabels:
      app: test
  strategy: {}
  template:
    metadata:
      creationTimestamp: null
      labels:
        app: test
    spec:
	  # non-root container (input.spec.template.spec.securityContext.runAsNonRoot)
	  securityContext:
	    runAsNonRoot: true
      containers:
        - image: httpd
          name: httpd
          resources: {}
status: {}
Conftest scanning for Dockerfiles
Policies:
# Denies the use of Ubuntu images
package main
denylist = [
"ubuntu"
]
deny[msg] {
input[i].Cmd == "from"
val := input[i].Value
contains(val[i], denylist[_])
msg = sprintf("unallowed image found %s", [val])
}
# A list of denylisted commands
package commands

denylist = [
  "apk",
  "apt",
  "pip",
  "curl",
  "wget",
]

deny[msg] {
  input[i].Cmd == "run"
  val := input[i].Value
  contains(val[_], denylist[_])

  msg = sprintf("unallowed commands found %s", [val])
}
The Dockerfile:
FROM ubuntu
ARG DEBIAN_FRONTEND=noninteractive
RUN apt-get update && apt-get install -y golang-go
COPY app.go .
RUN go build app.go
CMD ["./app"]
Running the test:
$ docker run --rm -v $(pwd):/project openpolicyagent/conftest test Dockerfile --all-namespaces
Image Vulnerability Scanning
Webservers or other applications can contain vulnerabilities (i.e. Buffer Overflows).
Targets:
- Remotely accessible apps in containers
- Local apps within containers
Unwanted Results:
- Privilege Escalation
- Information Leaks
- DDoS
Since container images are built in layers, the source of application vulnerabilites could lie in any of the layers that comprise the container image. Any container image scanning utility should have the ability to scan through all of the layers of a container image when searching for vulnerabilities.
Image Vulnerability Databases
Discovering vulnerabilites in your own images
- Scanning Dockerfiles before the build process
- Perform scanning during the image build process
- Perform scanning at runtime
- Restrict unapproved registries/images using PSP or OPA using Mutating Webhooks or Validating Webhooks
- Perform constant scanning on all images stored in Container Registries
Clair is an open source project for the static analysis of vulnerabilities in application containers (currently including OCI and docker ). Clair ingests vulnerability metadata from a configured set of sources to check images against and provides an API to program automation against. Can ne complicated to configure out-of-the-box.
Trivy is a simple and comprehensive vulnerability scanner for containers and other artifacts suitable for Continuous Integration. Trivy is known to be a simple, easy, and fast tool for vulnerability scanning.
Scanning images with Trivy
Using the binary:
$ trivy image python:3.4-alpine
Using the Docker container:
$ docker run ghcr.io/aquasecurity/trivy:latest image nginx
Secure Supply Chain
Private Container Registries
Using the docker login command allows you to give the docker daemon the necessary credentials to authenticate to private registries
$ docker login
$ docker pull wuestcamp/cks-hello-world
The same can be achieved in Kubernetes as well using the docker-registry Secret type
$ kubectl create secret docker-registry my-private-registry \
--docker-server=my-private-registry-server \
--docker-username=username \
--docker-password=password \
--docker-email=email

secret/my-private-registry created
The ServiceAccount that will use these credentials must also be granted access to the docker-registry Secret using the imagePullSecrets field.
$ kubectl patch serviceaccount default -p '{"imagePullSecrets": [{"name": "my-private-registry"}]}'

serviceaccount/default patched
Using a Container Image’s digest is the most accurate way to verify a Container Image. The Container Image’s tag can be changed or modified but the digest is a sha256 hash of the container image and cannot be easily replicated. The Container Image Digest can be found in the status.containerStatuses[].imageID field of a running pod’s manifest (kubectl get po <pod-name> -n <namespace>). The image digest can be used in place of the image tag to ensure a pod is using the exact desired image.
Specifying an Image using Tags vs. Digests
Image Tag:
...
spec:
  containers:
  - image: registry.k8s.io/kube-apiserver:v1.26.2
...
Image Digest:
...
spec:
  containers:
  - image: registry.k8s.io/kube-apiserver@sha256:0f03b93af45f39704b7da175db31e20da63d2ab369f350e59de8cbbef9d703e0
...
Allowlisting Image Registries using OPA Gatekeeper
The following ConstraintTemplate returns a violation for containers whose images are not coming from either docker.io or k8s-gcr.io.
apiVersion: templates.gatekeeper.sh/v1beta1
kind: ConstraintTemplate
metadata:
  name: k8strustedimages
spec:
  crd:
    spec:
      names:
        kind: K8sTrustedImages
  targets:
    - target: admission.k8s.gatekeeper.sh
      rego: |
        package k8strustedimages

        violation[{"msg": msg}] {
          image := input.review.object.spec.containers[_].image
          not startswith(image, "docker.io/")
          not startswith(image, "k8s.gcr.io/")
          msg := "not trusted image!"
        }
The Constraint Custom Resource K8sTrustedImages applies the rules set in the aformentioned ConstraintTemplate to all Pod resources in the cluster.
apiVersion: constraints.gatekeeper.sh/v1beta1
kind: K8sTrustedImages
metadata:
  name: pod-trusted-images
spec:
  match:
    kinds:
      - apiGroups: [""]
        kinds: ["Pod"]
ImagePolicyWebhook Admission Controller
The ImagePolicyWebhook admission controller works by contacting an external service before the creation of a new pod. The admission controller sends an object of kind ImageReview to the external service and will allow or deny the creation of the new pod based on if the ImageReview is approved or denied at the external service.
“ImagePolicyWebhook uses a configuration file to set options for the behavior of the backend. This file may be json or yaml and has the following format:
piVersion: apiserver.config.k8s.io/v1
kind: AdmissionConfiguration
plugins:
  - name: ImagePolicyWebhook
    configuration:
      imagePolicy:
        kubeConfigFile: <path-to-kubeconfig-file>
        allowTTL: 50
        denyTTL: 50
        retryBackoff: 500
        defaultAllow: true
Reference the ImagePolicyWebhook configuration file from the file provided to the API server’s command line flag --admission-control-config-file
The ImagePolicyWebhook config file must reference a kubeconfig formatted file which sets up the connection to the backend. It is required that the backend communicate over TLS.
The kubeconfig file’s cluster field must point to the remote service, and the user field must contain the returned authorizer.” -
https://kubernetes.io/docs/reference/access-authn-authz/admission-controllers/
# clusters refers to the remote service.
clusters:
  - name: name-of-remote-imagepolicy-service
    cluster:
      certificate-authority: /path/to/ca.pem    # CA for verifying the remote service.
      server: https://images.example.com/policy # URL of remote service to query. Must use 'https'.

# users refers to the API server's webhook configuration.
users:
  - name: name-of-api-server
    user:
      client-certificate: /path/to/cert.pem # cert for the webhook admission controller to use
      client-key: /path/to/key.pem          # key matching the cert